File mapping is used to dynamically distribute publications to a list of recipients based on selected slicers. The distribution list maps the slice elements to recipients who will access the publications using the Bulletin Board by their User or Role name in Pyramid. When the publication is built, the distribution list is then used to decide who should be able to access the built output using the Bulletin Board.
This topic is a walkthrough that uses the Bulletin Board Distribution configuration options to achieve a specific goal. For more information about the Bulletin Board Distribution options, see Bulletin Board Distribution in Publish Pro.
Tip: You can, alternatively, distribute your publications to users dynamically by email. For more information, see Dynamic Distribution by Email in Publish Pro.
Setting up a Dynamic Distribution List
To distribute your publication to a dynamic list of users through the Bulletin Board, you will need to:
- Build a mapping file that maps the slicer selections to either users or roles. When selected in response to the dynamic distribution list, these users will be able to access the built publication from the Bulletin Board.
- Create a Schedule for your publication:
- Select the Bulletin Board tab and then Use Dynamic List in the Distribution section.
- Configure the Mapping options to indicate that you are using a file (File Mapping), to specify the mapping options you have chosen (Map By), and to upload your file.
A copy of the publication will be sent to the Bulletin Board and access will be granted to all users in the mapping list. If the publication schedule was configured with multiple slicers in the Selections section (multi mode), then every copy of the publication will be available to every recipient in the list.
Step 1: Building your Mappings file
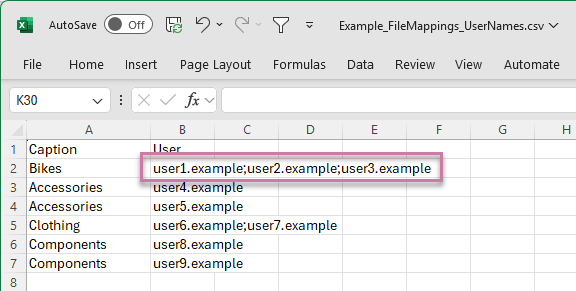
The Distribution List may be a .txt, .csv, or .tsv file. It maps the slicer members to the User names or Roles that should be used as targets for the given slice. It should conform to the formatting displayed in the image below:
Note: This format must be used, regardless of the number of slicers in the publication. If your publication contains multiple slicers, the distribution list should still contain only a single elements column, with elements from a single slicer only. The corresponding slicer will need to be selected in the Distribution panel when configuring your File Mapping options.
Header Row
The first row contains the headers for your file and is ignored by the mapping process. The list of elements and target emails or roles starts from the second row.
Column 1: Slicer Elements
The first column contains the names of the matching elements that are used in the slicer. These values must all be either Captions or Unique Names:
- Captions are the slice names, such as "Bikes" or "Accessories."
- Unique Names are the members described using PQL syntax, such as
[products].[Product Category].[Bikes].
All values are case sensitive.
Column 2: Recipients
Where distribution is to a Bulletin Board, the second column contains the user names or roles of the recipients when the given slice value is selected.
Multiple user names or roles can be mapped to a single slicer element by adding them as a semi-colon separated list of values. See purple highlight above.
Step 2: Configure your File Mapping options
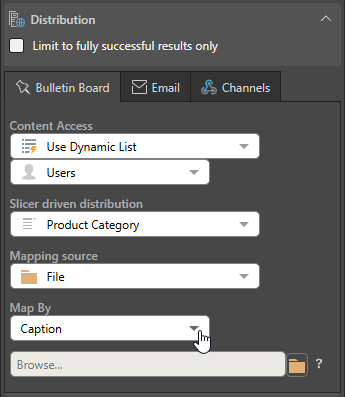
From the Schedule panel, select Distribution and then the Bulletin Board tab:
- From the Content Access options:
- Select Use Dynamic List.
- Choose whether to distribute using Roles or Users.
- From the Slicer dropdown list, select the relevant slicer.
- Under Mapping Method, choose File Mapping.
- Under Map By:
- Choose either Unique Name or Caption depending on the content of your distribution file.
- Import your Distribution file by clicking the Folder icon next to the dropdown list and finding / importing the distribution list from its file location.
If your report contains multiple slicers, you need to choose the slicer that should be used to lookup the distribution list. This is the slicer whose elements appear in the distribution list that will be imported.
Step 3: Committing the Schedule
Once you are done building your schedule, click Save (purple arrow below) to save and launch it. You can view the schedule's progress in the Content Explorer (or from the Admin Console if you are an admin):
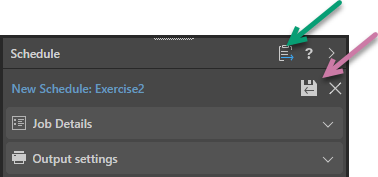
Note: When viewing your schedule in the Publish app, there is an option to go to the Schedule list in the Content Explorer (green arrow above). This provides access the publication's schedules for edit, delete, and so on and view any built publications.